Call Recording Portal User Guide

Active iPBX from Teleproject UK has a comprehensive Call recording portal, and this guide demonstrates how to Access recordings through your admin login.
Login with your Administrator Access.
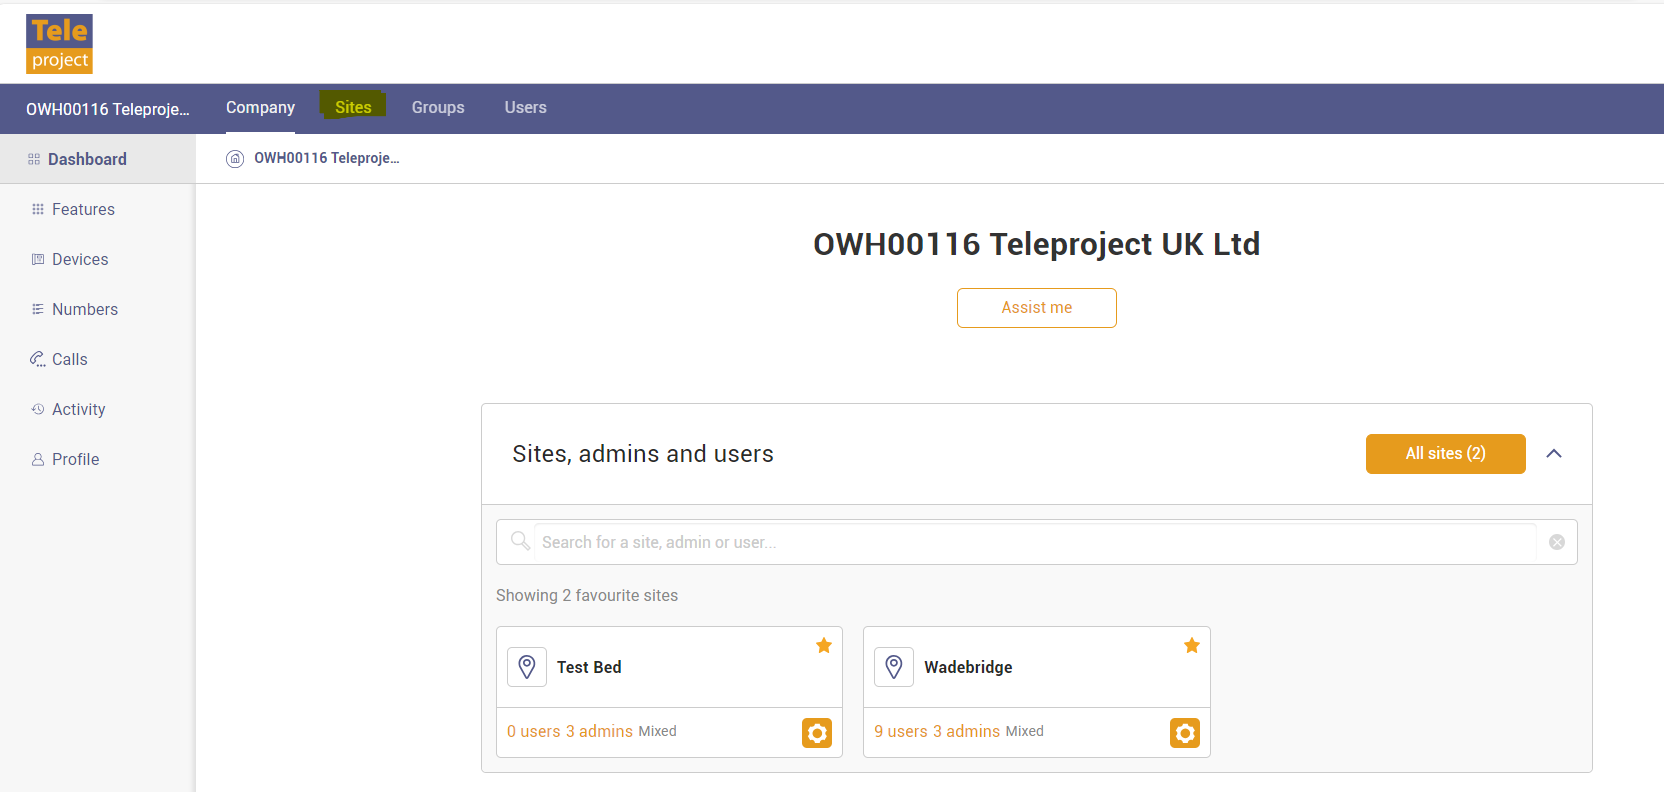
Then Select Sites
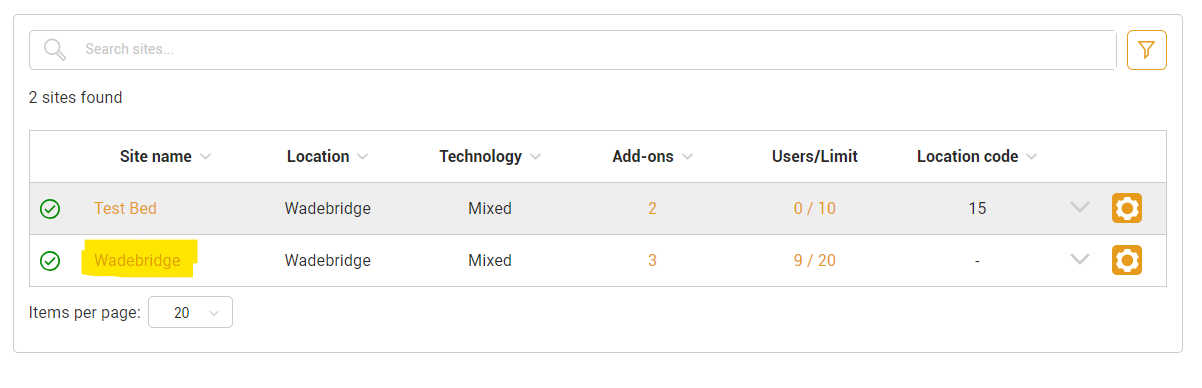
Then click on the Site you require and then click on the orange Details button in the Voice Recording Section.
Scroll to the Call Recording section at the bottom of the page
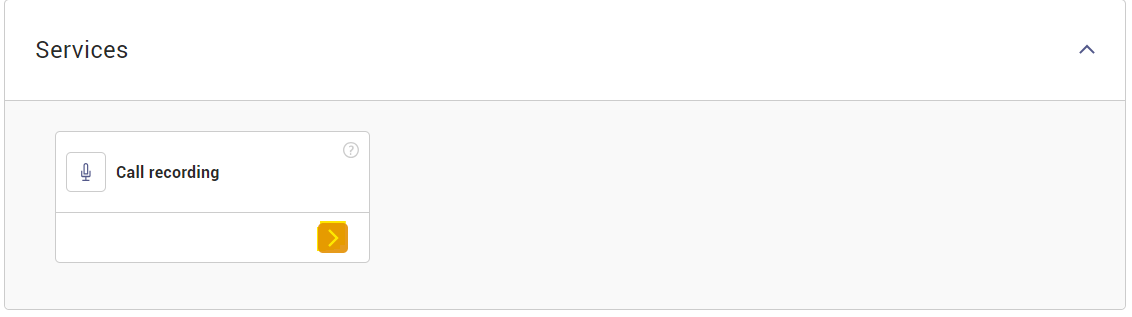
Click on the orange arrow.
The call recording management portal will now open in a new page.
On the left is a navigation menu with access to the following screens:
· Interactions
· Alerts
· Reports
· Modules
· Admin
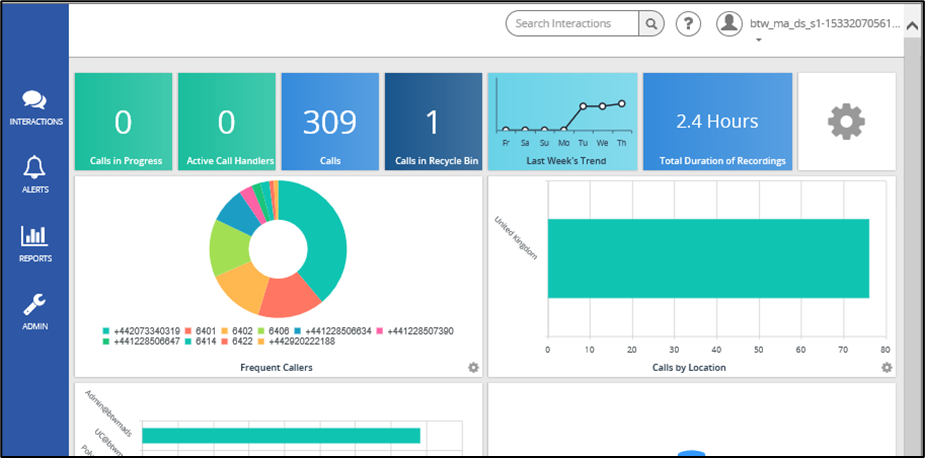
At the top of the Dashboard is row of First Look tiles that provide a quick overview of live and recorded calls. Clicking on the following tiles provides direct access to the appropriate screen within the Interactions section for more information:
· Calls in Progress
· Calls
· Call in Recycle Bin
The final tile in the First Look row is Dashboard Options. Click the tile to flip the pane and reveal the available settings. Here the auto refresh rate can be set for the Dashboard, the options are every 15/30 seconds or 1/2/4 minutes. A Pause Button is also included that can be used when refreshes need to be paused.
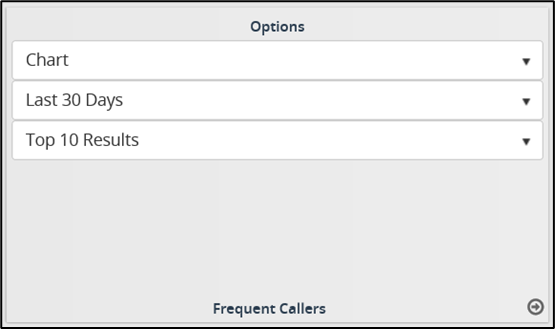
Chart - toggles between displaying the information in chart or table form. This option is available for all customizable panes except Recent Calls.
Last 30 Days - select the timeline for the information displayed in the pane. This option is available for all customizable panes except Recent Calls.
Top 10 Results - select the number of results displayed within the pane.
Once changes have been made, click the Return button in the bottom right of the pane to return to exit the panel settings.
The Dashboard is set up to automatically adjust the view when the screen size is minimised, ensuring the most efficient use of screen space for the user. When the screen is minimised, the information tabs move from the left side of the screen to the bottom.
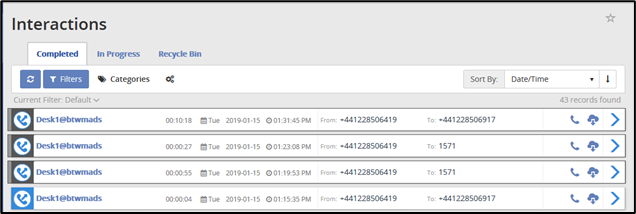
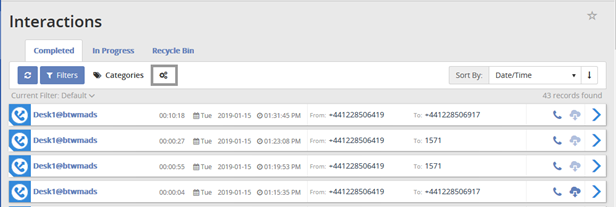
On the left side menu of the Dashboard, the first option is Interactions. Clicking this will take you to the Interactions page where you can access Completed, In Progress and the Recycle Bin call recordings.
TIP: Use the filters to search for specific numbers that called or were called. It is important that you enter the number in this format +441234567890 NOT 01234567890
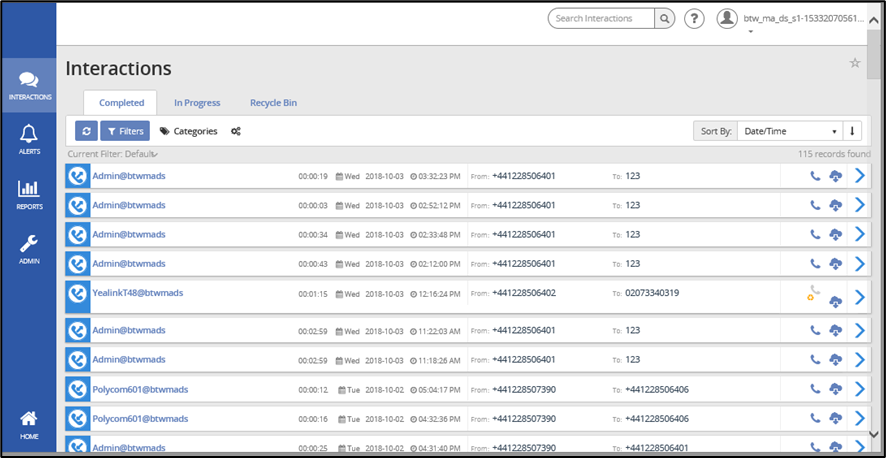
The page opens with all Completed calls displayed which provides a quick glimpse of vital information regarding the completed calls. The following information is displayed for recorded calls in the list:
User – the number or description associated with the call.
Duration – the length of the call.
Day – the day of the week the call took place.
Date – the actual date the call took place.
Time – the time the call originated.
From Number – the originating number.
To Number – the terminating number.
Play Recorded Call button – identifies whether or not there is a recording associated with the call. Click this button to open the Recorded Call and begin playing the audio. If the recorded call has already been sent to the recycle bin, the icon will be modified with a Recycle symbol.
Download button - downloads the audio file of the recorded call as a zip file.
View Details button - opens the recorded calls window.
Use the filter option in the top menu to create and save different customised views. Clicking on the User of any call will apply a filter to show all of that Users calls.
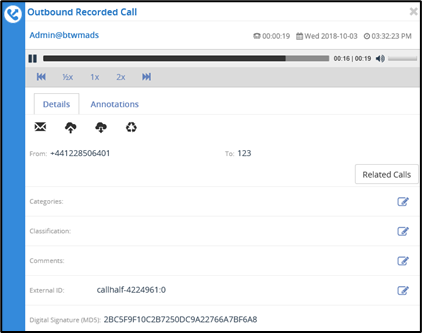
Select a call from the Interactions page
Click the Play Recorded Call icon to open the Call Details window.
The recording will automatically play.
Annotations allow you to add comments and markers to specific parts of calls to indicate where in the call a notable event might have occurred. For example: a contact centre manager (or any other user) can find a notable event in a call and to mark it for future review with a comment. Additionally, you are able to upload pertinent documents to Annotations and download them for future reference.

Select a call from the Interactions page
Click View Details to open the Call Details window.
Select the Play button to begin playing the recorded call.
Pause the call at any point to add a note and click the Add Annotation button.
Enter a subject and notes as needed, which will be time stamped at that point.
Attach a file if appropriate and save the annotation.
Continue playing the call adding further annotations if necessary.
Click the Save button when finished.
SIPT Pause & Resume Annotations
Voice Recordings that have been paused using the SIPT Pause & Resume method will automatically have an annotation added to the call which will contain the details of the pause and/or resume events in the Recorded Calls listing. Playback of these calls will have a silent gap in the call recording that corresponds to the pause/resume activations.
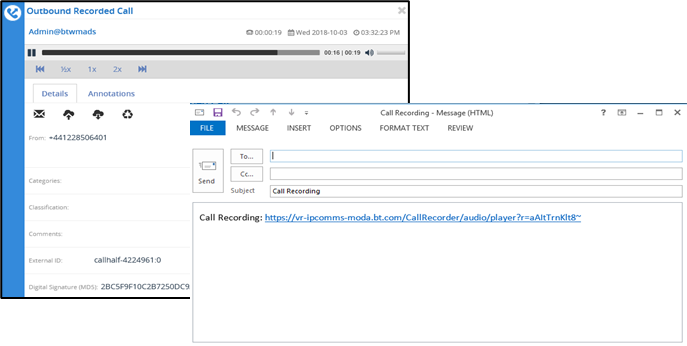
Situations will occur where you need to send a specific Voice Recording to a person that may not have access to the application or just for emphasis. In these instances, you have the ability to email the recorded call to that recipient. Although, there will not be an email option for any calls that have been deleted. You will still see the call detail but there will not be any audio associated with it.
- Select a call from the Interactions page
- Click View Details to open the Call Details window.
- Click the Email icon to trigger an email to open with a link to the call recording.
- Enter the email address(es) of the recipients.
- Click Send
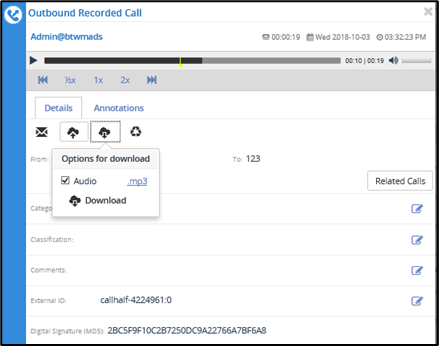
Download a Single Recorded Call
Individual calls can be downloaded from the main Interactions page or from the View Details window. Files are downloaded as a zip file that contains the audio file in MP3 format.
To download voice recordings, follow the steps below:
- Select a call from the Interactions page
- Click View Details to open the Call Details window.
- Click the Options for Download icon.
- Click the Download button.
- You have the option to either Save the files or Open and view them.
Download Multiple Recorded Calls
Up to 20 calls can be downloaded from the main Interactions page in one transaction. Calls are downloaded as a single zip file that contains all the audio files individually in MP3 format. Calls can be downloaded in bulk from either the Completed or Recycle Bin areas of the Interactions pane.
To bulk download voice recordings, follow the steps below:
• Navigate to the Interactions page, either the Completed or Recycle Bin tabs.
• Select up to 20 calls you wish to download by clicking in the corresponding option box to the left of the item.
Selected items will turn grey.
·• Click the Bulk Options icon in the top panel to open the Bulk Options window.
·• Under Download Options click the Download Selected button.
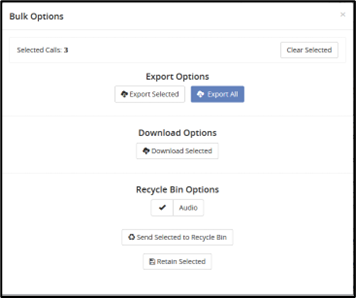
• You will have the option to either Save or Open the file
• If further calls are to be downloaded from an existing list, use the Clear Selected button in the Bulk Options window to deselect the previously downloaded calls before closing the Bulk Options window
As long as the original Interactions page is not refreshed, previously selected calls will show the bottom left corner of the icon to the left of each recording in white and the Download cloud icon will lighten in colour to signify calls that have been downloaded. This will help highlight where call lists of greater than 20 calls are required to be downloaded in multiple transactions.
If a call recording is not needed, it can be sent to the recycle bin.
• Select a call from the Interactions page.
• Click View Details to open the Call Details window.
• Click the Recycle Media Options icon.
• Click Send Audio to Recycle Bin
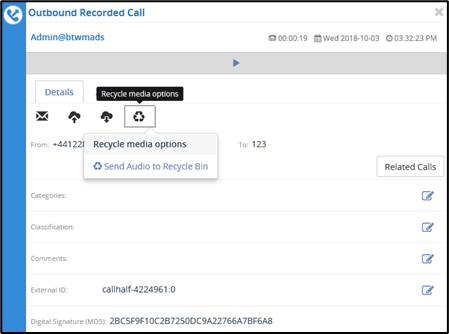
A record of the recording will however remain in the Completed Calls list which now includes a recycle icon as an indication that it has been sent to the Recycle Bin.
Delete Multiple Recorded Calls
If a number of call recordings are not needed, they can be sent in bulk to the Recycle Bin.
• Navigate to the Interactions page
• Select the calls you wish to delete by clicking in the corresponding option box to the left of the item.
Selected items will turn grey.

• Click the Bulk Options icon in the top panel to open the Bulk Options window.
• Under Recycle Bin Options click the Send Selected to Recycle Bin option

• If further calls are to be deleted from an existing list, use the Clear Selected button in the Bulk Options window to deselect the previously deleted calls before closing the Bulk Options window
As long as the original Interactions page is not refreshed, previously selected calls will show in the bottom left corner of the icon to the left of each recording in white and the Playback icon will include a recycle symbol to signify calls that have been moved to the Recycle Bin for deletion.
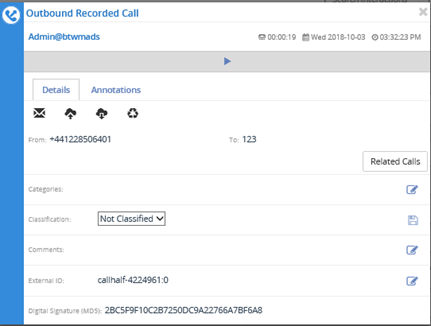
• Select a call from the Interactions page
• Click View Details to open the Call Details window.
• Click the Edit link in the Comments section.
• Enter a comment.
• Click Save

The ability to create categories for calls is beneficial to agents and managers because it allows them to categorise calls into areas unique to their business (for example: geographic region or customer satisfaction). You are then able to filter calls or run reports based upon these call categories.
• From the Interactions page, click the Categories button in the top menu.
• This will open the Categories window, which displays all available categories.
• In the text box, enter a new category name.
• Click the down arrow to the right and select a colour.
• Click Save to add the new category to the list
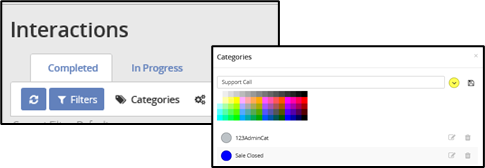
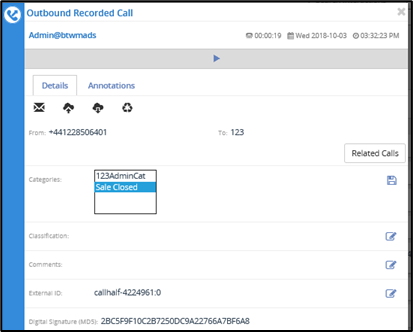
Note: categories are specific to the User that created them. Other Users (including Admins) are not able to see what category a user has assigned to a particular call.
Category assignment of recorded calls is permitted after the creation of categories. When assigning a category to a call:
• Select a call from the Interactions page
• Click View Details to open the Call Details window.
• Click the Edit link in the Category section.
• Select the category from the drop-down list.
• Click Save.
Classifications allow the user to set access permissions on a call. Calls can be assigned a classification, and cannot be accessed by users without explicit classification permissions.
Note: Classifications assigned to an Interaction CANNOT be removed.
• Click the Admin tab on the side menu to open the Admin page.
• Select the Classifications option to open up the Classifications page.
• Existing Classifications are listed.
• Enter a new Classification name in the text box.
• Click Add.
• The new classification will be added to the list below.
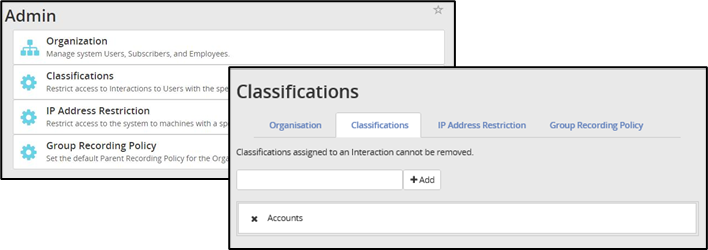
Assign Classifications to Calls
• Select a call from the Interactions page
• Click View Details to open the Call Details window.
• Click the Edit link in the Classification section.
• Select the classification from the list
• Click Save
Note: Classifications assigned to an Interaction CANNOT be removed.
The Calls in Progress screen displays all calls that are currently being recorded. From the Calls in Progress screen you can monitor a call in progress allowing you to listen in on a call without the other call participants hearing you. You are also able to save a recording “on the fly” from this screen if a particular Number has been set as Do Not Record by the Group Administrator. And as with the Recorded Calls tab, you can add notes or categorise calls in progress. In order to better manage this screen, all column headers can be sorted by clicking on the applicable column header. Click once to sort the column in ascending order and click one more time to sort the column in descending order. The following information is displayed on the Calls in Progress screen:
• User – the Number or description associated to the call
• Day – the day of the week that the call originated
• Date – the date the call originated
• Time – the time the call originated
• From Number – the originating number
• To Number – the terminating number
• Recording Status – will always show a green microphone symbol for active recorded calls
• Monitor button – provides a monitoring button that corresponds the that particular call in progress
• Save Recording button – identifies whether or not the call is to be saved when it is complete. If all calls are set to be saved, the option box will appear disabled. If calls are not set to be saved, the option box will be enabled and the user can save a call on the fly by clicking in the option box while the call is still in progress.
• View Details button – where Comments, Categories and Classification can be assigned to the call.

By default, all calls to and from a Number are recorded and saved. The Group Administrator does have the option to override this default by applying the Do Not Record feature. For calls that aren’t set up to be saved, you can, on a one-time-basis, save them on the fly by clicking the Save button while the call is in progress.
• Click in the Save icon to record this call only. It will not record all calls going forward for this Number.

Note: Pausing or resuming a recording will automatically create an annotation for the call.
Monitoring a call is easy and can occur at any point in the call. Monitoring is used in situations such as: training, behaviour issues, or legal reasons. The other participants in the call are never aware that it is being monitored.
• Click on a call from the In-Progress screen.
• Click on the headset icon.

Please be aware that there is a slight delay due to the signal reaching the GUI but it is only a slight delay (>1 sec). If monitoring calls is a permanent required business function, the customer should be using the Active iPBX ‘Call Barge In’ feature and not the monitoring function within the Voice Recorder.